From Basics to Brilliance: The Easy Guide to 3D Embroidery
Are you looking to take your embroidery skills to the next level? 3D Embroidery is a fantastic way to add dimension and texture to your projects. In this easy guide, we will take you through everything you need to know to create stunning 3D embroidery pieces. Let’s dive in and explore the world of 3D Embroidery.
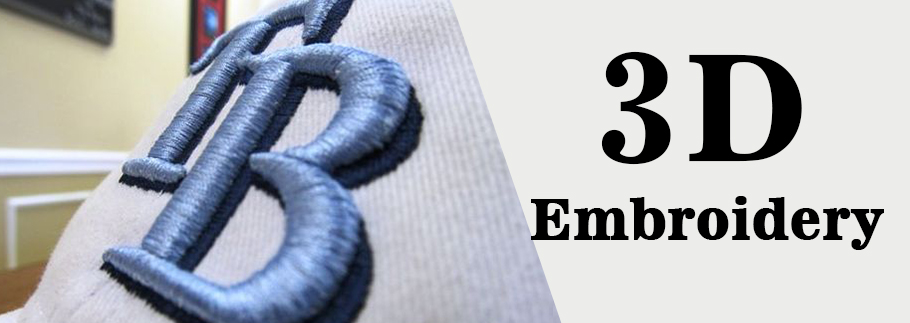
Understanding 3D Embroidery
3D embroidery raises the conventional art by adding a substantial profundity to the craftsmanship. This strategy rises above the level, of a two-layered appearance related to standard embroidery by consolidating different materials and careful sewing methods. Through the key layering of strings, fuse of dabs, and, surprisingly, the consideration of contemporary things like froth or wire, embroiderers can create pieces that in a real sense stick out. This approach not only upgrades the visual allure of the embroidery but also welcomes material cooperation.
Each piece turns into a little model, with components that ascent from the texture. Making shadows and surfaces that change with the light. This method moves the maker to think past the surface, taking into account the variety and example. In addition to the structure and construction of their plans. The potential outcomes with 3D embroidery are huge, restricted exclusively by the embroiderer’s creative mind. And eagerness to investigate new materials and techniques to rejuvenate their dreams.
Gathering Your Supplies
Leaving on a 3D embroidery venture requires an organized choice of instruments and materials. Fundamental to your tool compartment is embroidery circles, which act as the structure for your manifestations. An assortment of weaving floss tones will reinvigorate your plans, while a combination of needles guarantees you have the right device for each line. The decision of texture is critical, as it goes about as the material for your craftsmanship.
For those hoping to add an aspect, consider joining dabs, wires, or even little bits of froth into your munitions stockpile. These extra materials open up new roads for imagination, permitting you to explore different avenues regarding surface and profundity in manners customary embroidery doesn’t. As you gather these provisions, ponder the particular influences you wish to accomplish in your venture. Every decision, from the kind of string to the embellishments you integrate, will impact the ultimate result, giving an exceptional person to each piece you make.
Preparing Your Fabric and Hoop
Before leaving on your 3D embroidery venture, it’s pivotal to appropriately set up your texture and band, as this establishes the groundwork for your whole task. Begin by choosing a piece of texture that supplements the plan you intend to make. When picked, delicately stretch the texture over the embroidery band, guaranteeing it’s equally rigid across the whole surface. This step is fundamental as it forestalls puckering and assists keep your lines with informing and your plan undistorted.
A completely ready texture in a firmly gotten circle makes it more straightforward to move your needle and string. Working with the complex turnout expected for 3D embroidery. This arrangement helps with achieving the exact joint position as well as support. The consolidation of different materials is expected to add profundity and surface to your undertaking. With your texture and circle preparation, you’re currently set to rejuvenate your 3D embroidery vision.
3D Embroidery Stitches and Techniques
To bring your embroidery to life with a three-dimensional flair, mastering a few fundamental stitches and techniques is essential. The French knot is perfect for adding small, textured dots that pop out from the fabric. For longer, worm-like textures, the bullion stitch is your go-to, allowing you to create varying lengths and thicknesses. The seed join can be dissipated across regions to add a granular surface, emulating the vibe of small seeds.
Layering these lines can deliver a considerably more articulated 3D impact, making profundity and interest in your plans. They are integrating materials, for example, globules or little froth pieces while executing. These join can raise the dimensionality of your work. As you become more OK with these methods, try different things with the strain. Separating your fastens will empower you to tweak the material experience of your weaving. Adding an individual touch to each piece you make.
Creating Your First 3D Embroidery Project
Now that you have a good understanding of 3D embroidery and have gathered your supplies, it’s time to create your first project. Start by sketching out your design on the fabric and choosing the colors and materials you will use. Begin stitching your design, incorporating different stitches and textures to achieve a three-dimensional effect. Don’t be afraid to experiment and let your creativity shine through in your embroidery.
Conclusion
Congratulations! You have now completed your first 3D embroidery project. We hope this easy guide has helped you understand the basics of 3D embroidery. And inspired you to create your stunning pieces. Remember to practice and experiment with different techniques to enhance your skills and create even more brilliant 3D embroidery projects in the future. Happy stitching!