Custom digitizing may be a process that changes a design or artwork into an avant record that can be utilize by embroidery machines to form staggering embroidered items. In this down-to-earth direct, we are going walk you through the steps included in custom digitizing, from understanding the essentials to acing progressed techniques. Whether you’re modern to custom digitizing or looking to upgrade your abilities, this direct is outline to assist you explore the world of digital embroidery with certainty.
Understanding Custom Digitizing
Custom digitizing includes changing over artwork into a machine-readable arrangement, allowing embroidery machines to reproduce the design with exact stitches. This complex process requires a profound understanding of different fasten sorts and how they are associate with distinctive fabrics and designs. By acing the art of digitizing, one can guarantee that the embroidery machine precisely translates the design, keeping up the keenness and aesthetics of the initial work of art. It’s a specialized ability that mixes inventiveness with innovation, empowering the creation of point-by-point and solid embroidered pieces. As you dive into custom digitizing, you’ll learn to control stitch designs, densities, and bearings to bring your designs to life on a substantial medium.
Preparing Your Design for Digitizing
The beginning step in custom digitizing is to prepare your work of art for the digital change process. This implies refining your design to guarantee it’s as clean and fresh as conceivable. Any pointless components ought to be dispense with to avoid complications amid the digitizing stage. It’s pivotal that the picture is of tall resolution, as any flaws or low-quality viewpoints of the design can directly influence the digitizing result. This preliminary arrangement is vital for laying a strong foundation for digitizing preparation, setting the arrangement for a smoother move into a machine-readable arrangement that can be faultlessly execute by an embroidery machine.
Choosing the Right Digitizing Software
When selecting a digitizing computer program, it’s significant to center on highlights that adjust along with your embroidery needs. Survey the program for user-friendliness, guaranteeing it doesn’t have a soak learning curve that could prevent your progress. Compatibility with your existing embroidery machine is another noteworthy factor because it will streamline the method from plan to embroidery. Search for a computer program that provides comprehensive specialized bolster – this may be a lifesaver for beginners experiencing startling challenges. Well-known choices to consider incorporate Wilcom, Beat, and Bring Forth Embroidery, each advertising one-of-a-kind benefits custom-made to diverse client needs. Assessing these variables will assist you in selecting a program that not as it were fits your quick requirements but also supports your digitizing travel as you develop.
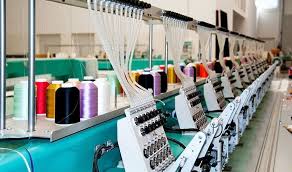
Step-by-Step Guide to Digitizing Your Design
To begin, transfer your arranged artwork into the chosen digitizing computer program. Following, choose the particular stitch sorts that best complement your design, such as glossy silk or fill fastens. This can be taken after by setting the stitch parameters, counting thickness, underlay, and course, to coordinate the design’s prerequisites. The genuine digitizing process includes carefully following the design’s forms with the chosen stitch designs. At long last, it’s significant to conduct a test run of the digitized design on a scrap piece of fabric. This step is basic to guarantee the embroidery quality meets desires and allows for any fundamental alterations sometime recently last application.
Tips for Testing and Adjusting Your Digitized Design
Once you’ve completed the digitization of your design, the next critical step involves rigorous testing on various types of fabric. This process is crucial for identifying how different fabrics interact with your design and ensuring optimal stitch quality. During these tests, closely monitor how the fabric responds to different stitch densities and underlays, as this will impact the final look and feel of your embroidered piece. Adjustments may be necessary to fine-tune the design for specific materials.
For instance, a heavier fabric might require increased stitch density for the design to stand out. While a delicate fabric might need a lighter density to prevent damage. Additionally, paying attention to thread tension is paramount; too tight. The fabric may pucker, too loose, and the stitches could appear saggy. Each test run is an opportunity to learn and improve, so embrace this phase as a key part of your digitizing journey. Adjust your design parameters based on these findings to ensure your embroidery looks professional and polished across all types of fabric.
Beyond the Basics: Advanced Custom Digitizing Techniques
Plunging into the domain of progressed custom digitizing opens a world of possibilities for improving your embroidery projects. To promote your creations, consider joining angle stitches for a more reasonable shading impact, or utilize 3D puff embroidery for a raised material feel. The authority of these methods allows the making of complex, multi-layered designs that genuinely stand out. Testing with variable stitch lengths can include profundity and surface, giving an exact quality to your embroidered pieces.
For those looking to push the boundaries further. Exploring the use of programmable stitch effects can introduce dynamic patterns and visuals previously unattainable through basic digitizing methods. Engaging with a community of digitizing experts through forums. Social media can also provide insights and inspiration for applying these advanced techniques effectively. As you progress, continually challenge yourself with complex projects that require precision. And creativity, harnessing the full spectrum of digitizing capabilities to produce exceptional embroidery art.
Conclusion
Embarking on the travel of custom digitizing opens the entryway to unending creative conceivable outcomes. With perseverance and the right application of the techniques outlined in this guide, you’ll refine your aptitudes and lift your embroidery projects. The way from amateur to master in digitizing is filled with learning openings and minutes of achievement. As you progress, proceed to investigate modern strategies and grasp the challenges that come with complex designs.
Locking in with the digitizing community will encourage and enhance your involvement, advertising insights, and motivation from individual devotees. Keep testing with different surfaces, fabrics, and stitches to find interesting combinations that bring your dreams to life. This exploration not only improves your collection but also guarantees your embroidered creation’s charm and inspiration. Remain inquisitive, hone diligently, and let your digitizing travel lead you to deliver extraordinary and personalized weaving that stands the test of time.